That "how-to" explains it all very well, but is specific to replacing the entire regulator - I'll repeat some of what was done in his
write-up, but mine is a back passenger door and specific to just replacing the power window cable block
The only changes I'd add to the original how-to are:
1. you only need a couple pieces of tape to hold the window up.
2. lower the windows a few inches (front and rear) to make it easier to remove/replace the clips on the window bracket and to pop the window on and off the bracket (you need a little movement)
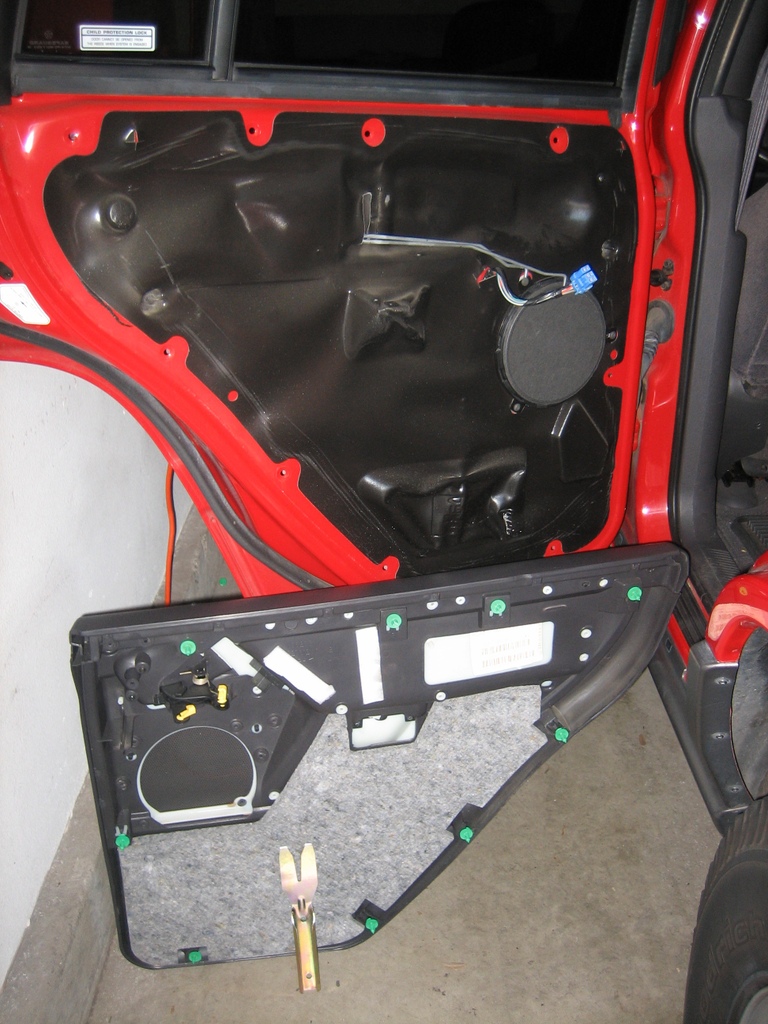
The example here is a back passenger door, basically the same removal process as the fronts but I'll go through it again anyway:
1. Remove 1 Phillips screw in the door pull pocket and 1 torx screw behind the door release handle.
2. There are 9 clips that hold the rear door panels on. Starting at the bottom pry out with a door panel removal tool (or similar). The clips are supposed to pull out of the metal and stay attached to the door panel.
(Note: I've now done all 4 doors, and I broke 2 clips on each door - I'm sure it's possible not to break any, but I couldn't figure out how. It's a good idea to get a few extra clips before hand so you have replacements ready).
Click to enlarge
3. Disconnect the lock / release connector rods by flipping the white plastic retainer clip off the rod, then pull the rod out of the mechanism on the door panel.
4. Disconnect the window switch connector from the switch.
5. The speaker is held in place by 3 Phillips screws, remove these then disconnect the wire holder and wire connector from the back of the speaker. (Note: the speaker will only go back in the way it came out, take note of the position to make the re-install a little faster)
6. Pull the black plastic weather shield off - try to get the black tar/mastic to stay on the plastic sheet in a bead - it will adhere back to the door just fine while you are putting the door back together.
Click to enlarge
7. Here's where the instructions depart a little from the original "how-to". Remove the window switch from the door panel and temporarily re-install it on the wire harness. Once back on, operate the window while looking at the window bracket guide track through the open door panel. Refer to the pictures, but basically you need to line the plastic cable block (that you will be replacing) with the large "dimple" in the guide track. By doing this, you will later have the room you need to remove the plastic cable block.
Click to enlarge
8. Back to the original "How-to" - remove the metal retaining clips (2) that secure the window to the window bracket. Once removed, pop the window off the bracket, push the window up, and use a couple pieces of tape to secure it out of the way at the top of the door.
9. Remove or loosen the 6 bolts (3 x 8mm, 3 x 10mm) that hold the regulator and motor in place. In addition, on the WJ's back doors there is a metal clip on the middle/front area of the door that holds the regulator cable in place. Using a flat screwdriver, release the clip and slide it into the door - it will remain fastened to the cable so no worries about losing it. (see Pic #2 above)
10. Remove the regulator and motor from the door.
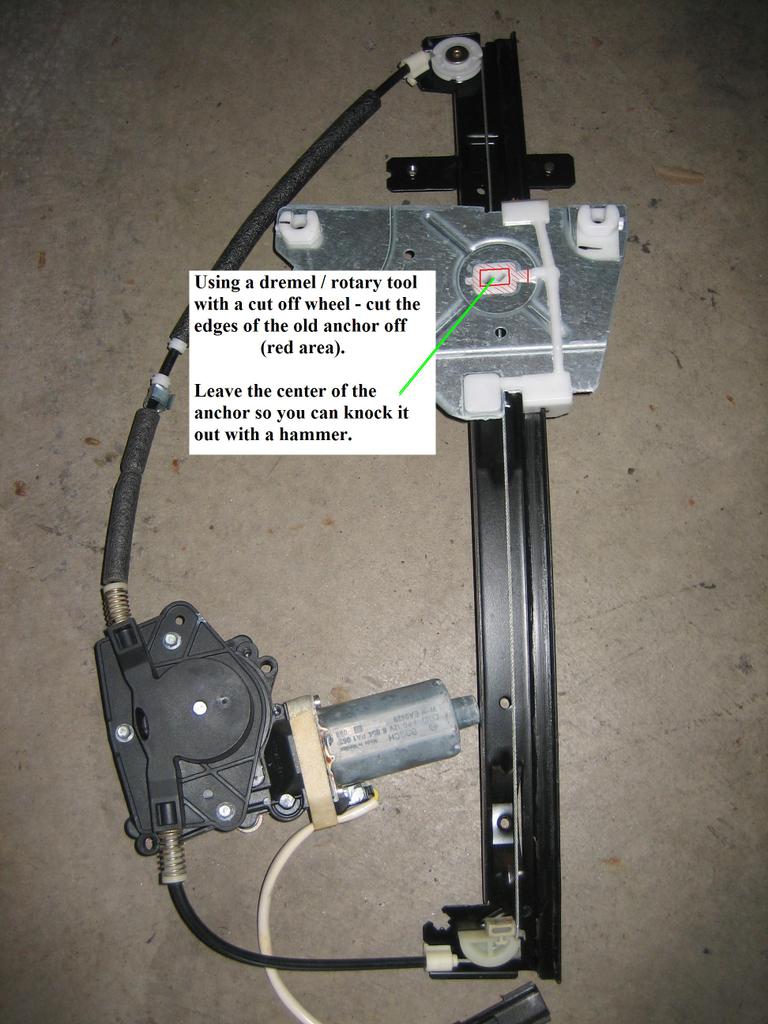
11. Here again is where this how-to departs from the original. Refer to the pictures, but basically you need to cut / remove the plastic around 4 edges of the old cable mounting block. The instructions from "Digital Tuning, Inc." indicate to use a heat gun to soften the plastic, but I found that a dremel + cut-off wheel work great and fast. Cut the four sides of the plastic cable block off, flush with the metal of the window bracket. Leave the center of the cable block as is / raised above the surrounding metal. Once you've removed the surrounding plastic use a hammer to gently knock the block out of the bracket (this is why it's easier to leave the center as is rather than grinding the whole thing flat)
Click to enlarge
Click to enlarge
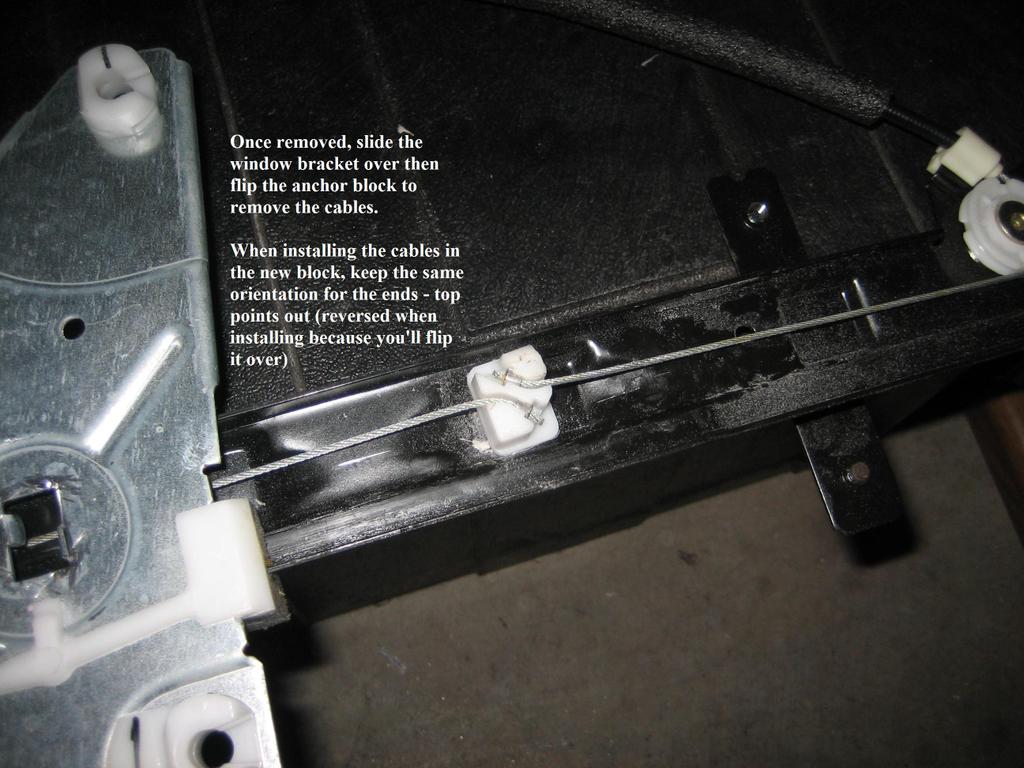
12. Once the cable block is knocked out, you can work the bracket down the guide track and out of the way. The cable block can now be flipped over - take note of the direction that the ends of each cable are pointing - you should reinstall the cables to point the same direction in the new block. Using channel-locks and pliers you can now remove the cable ends from the plastic cable block.
Click to enlarge
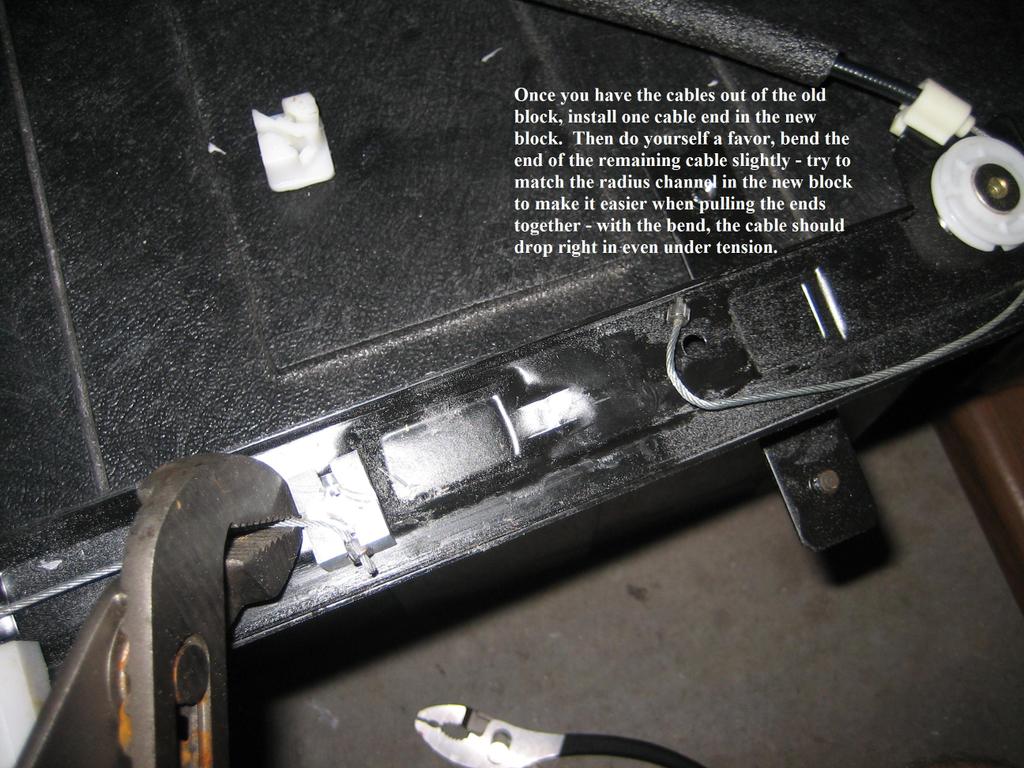
13. Now take the new metal cable block and remove the top piece and screws. You can put one end of the cable in the new block at this time - but take note to put the cable end so that it points the same way as it did in the factory plastic block (per Digital Tuning Inc, "the top cable is always anchored closer to the track")
14. Using pliers, bend the other cable end slightly so that it matches the curve of the aluminum block - if you match the radius of the curve in the block, when you are pulling the cables together you will be able to line it up and drop it in. If you don't bend the cable, you'll
need someone's help to guide the cable end into the block while you are pulling the ends together.
Click to enlarge
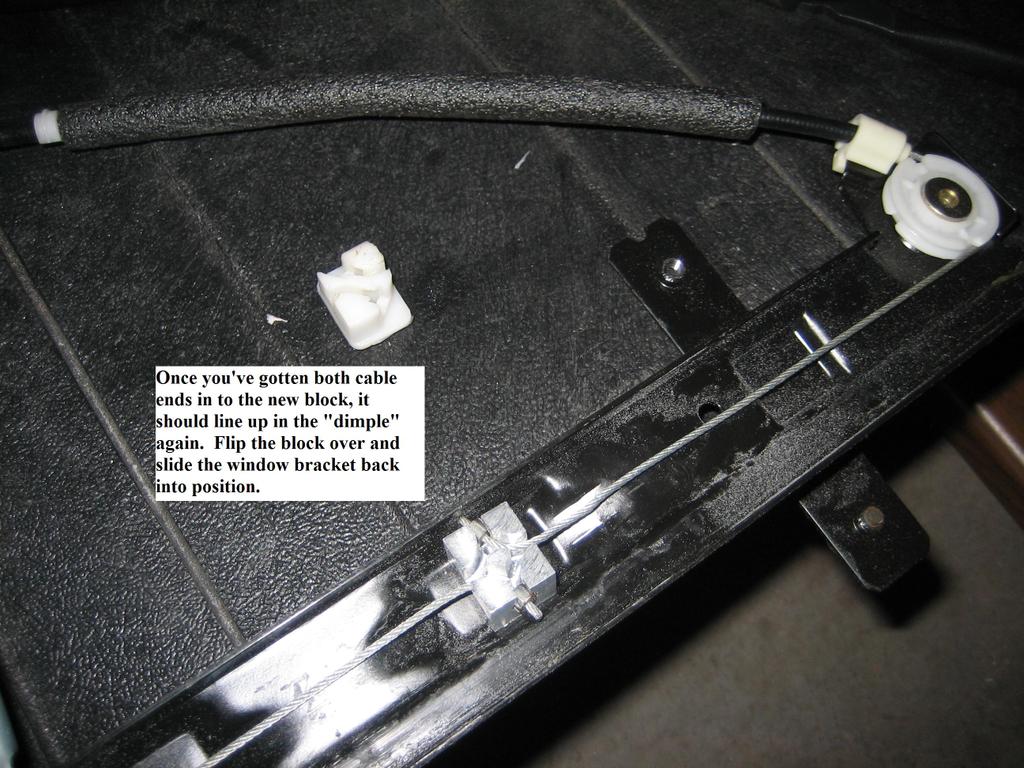
15. Once the free cable end is bent to match the radius, use your pliers and channel locks again to pull the block+cable and the free cable together. If you matched the radius pretty closely, the end will drop in - release tension, and the cables are now attached again. Flip the block over in the dimple so that the 2 screw holes are pointed up.
Click to enlarge
16. Slide the window bracket back up the guide track and line it up over the new anchor block. You can use a flat bladed screwdriver to prop the block up a bit so that it fits into the hole in the window bracket (if necessary). There are two metal flanges on the window bracket that will line up the new anchor block and help to hold it in place.
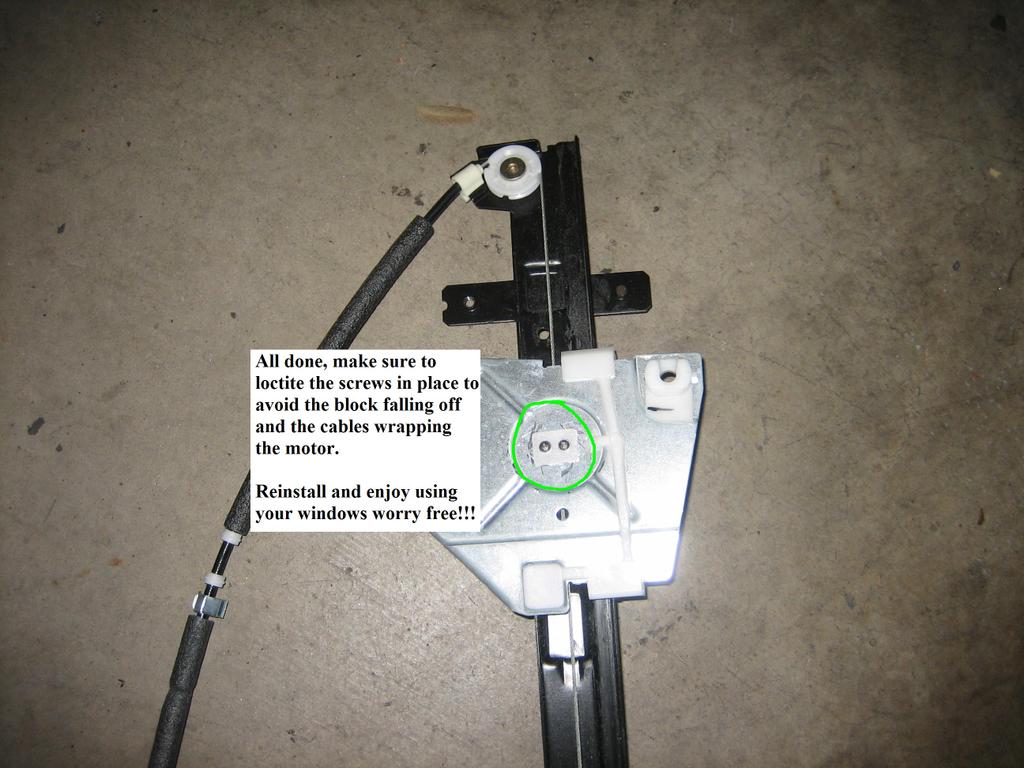
17. Use some loctite (as per the manufacturer recommendation) in each screw hole, install the top of the new anchor block, and screw it down until the new anchor block is securely fastened to the window bracket.
Click to enlarge
18. Reverse the process and reinstall the regulator - Now you can use the windows without worrying about that impending "BANG" you'll hear as you watch the glass disappear into the door....
The manufacturer (Digital Tuning, Inc) recommends that you replace the blocks BEFORE the factory block breaks - this is because the cables may wrap the motor and get destroyed. I tossed my broken regulator and replaced it with a non OEM regulator, then replaced the 3 blocks on the remaining OEM regulators before they broke. I can't imagine trying to get new cables at the local hardware store and re-installing them to fit ... I'd definitely go with the recommendation that you take the time to replace the blocks before you break the anchor block... Not to mention that these blocks are about 1/3 the cost of a replacement regulator.